
Hello Blogging Friends,
It is my turn today on the Joy Clair Blog and I have a card to share with you that I made with the Joy Clair Flawless stamp set.

This stamp set is great for all those girly layouts in your scrapbooks!

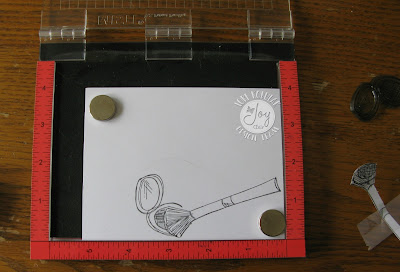
For this A2 card I started with a piece of watercolor paper that I placed onto my Misti and then I played around with the layout of the stamps until I found a design that I liked. To start my card I knew I had to make a mask for the powder compact so that I could stmp the brush on top of the compact.

So I placed the powder compact and brush stamps on some watercolor paper on my Misti.


Then I stamped them with some black ink.

Next I fussy cut them out so I could mask off the powder compact where I want the brush to be lying on top of the compact. So I place the cut out brush onto the paper and then I stamp the compact onto the paper.

Now I can remove the brush mask and stamp the brush on top of the compact.

I placed the stamps where I wanted them on my card to see how it looks, and then if I like the layout I start stamping the stamps with black ink onto the watercolor paper.


When I have stamped everything it is time to color the images.

To color the images I used Copic marker BG10 to color in the mirror on the compact. I used E02 for the powder, W1 and W3 for the compact, C5 for the bristles on the brush, E37 for the wand brush, W3 for the band in the middle. For the lipstick I used W3, R85 and E04. I used BG23 for the mascara and R20 for the Be-You-tiful box. Then I took Wilted Violet Distress Oxide and watercolored the background with that and then I spritzed some water on it.

But it still didn't look quite right to me, so I stamped the flowers by the box with black in and I used Blue Lagoon Nuvo Crystal Drops for the centers of the flowers and then I put three litttle dots of the drops in the top left hand corner and then the bottom right hand corner. I decided to add the sentiment, so I stamped that with black ink in the middle of the card. I mounted that to some turquoise paper and then added that to a white A2 card base.

This was my first time using the Distress Oxide so I think I will have to practice with it some more. I love the way the card came out with all the beauty items and the sentiment!
I hope I have inspired you to try something new today!
Thanks for stopping by!
Lori
Such a cute and pretty card. Love the sentiment and those stamps. I just got the Oxide inks and can't wait to try. Love the way you did this.
ReplyDeleteLynn
Hi Lori this is a stunning card those stamps are amazing. I haven't got any Distress Oxides yet but I will. Take care. Hugs Jackie
ReplyDeleteThis is so beautiful, Lori!! I love the colors and the images!! The masking is fabulous!! I have got to get the new Distress Oxides!! Love how they look!! Have a great day!! Big hugs :)
ReplyDeleteLisa
A Mermaid's Crafts
Kori, this is awesome! I love the stamps and fun sentiment! I can't wait to try the Distress oxide inks (great background)...just ordered some inks a few weeks ago and sitting here when I get some craft time in.
ReplyDeleteHave a great day!
Sherrie K
Gorgeous Lori. A few more things to add to my wish list. I was a Mae-up artist/ beauty consultant for many years at Macys. Love these stamps and what you did with them have a great day
ReplyDeleteThese came out great Lori, I love how you misti'd them how! fun pretty colors and great design, Have a great evening
ReplyDeleteWow..really pretty card! Love the masking, such a fun stamp set!
ReplyDelete